Showing posts with label plants. Show all posts

Wednesday, October 12, 2022

A birthday swap, garlic and kitchen plans

It really feels like autumn now and I'm finally starting toget into miniature again ;)
So far, the past few months have been limited to the days when I crafted with Jolinda.
Last month, however, it was Jolinda's birthday and that meant making a swap :)

I'd seen a great workshop from SweetMiniDollHouse for making a plant with a Fimo cane and I wanted to try that. Funnily enough, Jolinda'd happened to watch that same workshop too, with the idea 'for later'.
I also tried making a tea box (a workshop by Anita Brouwer). That was - especially with Balsa - so delicate that I didn't even dare to stain it :'). At last made a leather shopping bag, which always comes in handy with all those vegetables Jolinda has made these last few months :)


Het is inmiddels echt herfst geworden en ik begin eindelijk weer wat knutselkriebels te krijgen ;)
Tot dusver bleef het de afgelopen maanden beperk tot de dagen dat ik samen met Jolinda knutselde.
Afgelopen maand moest ik echter wat eerder beginnen, want toen kwam de verjaardag van Jolinda eraan en dat betekende een swapje maken.

Ik had een geweldige workshop gezien van SweetMiniDollHouse voor het maken van een plant met een cane van Fimo en die wilde ik maken. Grappig genoeg had Jolinda diezelfde workshop toevallig ook bekeken, met het idee 'voor later'.
Nog geprobeerd er een theedoos bij te maken (een workshop van Anita Brouwer). Dat was - zeker met Balsa - zo priegelig dat ik het niet eens meer durfde te beitsen :'). Tenslotte nog een leren boodschappentas gemaakt, die komt altijd wel van pas met al die groente die Jolinda de laatste maanden gemaakt heeft :) 


We both made garlic last time using this tutorial from This Charming Stuff. My first ones turned out very large (I made a strand of that anyway). Finally found the right size and shape.

We hebben de vorige keer allebei knoflook gemaakt met behulp van deze tutorial van This Charming Stuff. De eerste vielen wel erg groot uit bij mij (daar heb ik toch ook een streng van gemaakt). Uiteindelijk de juiste maat en vorm gevonden.


Last weekend I got inspiration to move on with the cottage kitchen.
First I looked at my notes so that I could make a coherent whole with all those separate ideas. Decided that the wall lenght units that were on my to-do list didn't really fit the atmosphere I want to give my cottage. Instead, fewer furniture so I can fit a small kitchen island and a (fake)back door.
I made another map (the fourth and hopefully last version ^^);

Afgelopen weekend kreeg de inspiratie om eindelijk verder te gaan met de cottage keuken.
Eerst eens gekeken naar mijn aantekeningen zodat ik met al die losse ideeën een samenhangend geheel kan maken. Besloten dat de hele kastenwand die op m'n to-do-lijstje stond eigenlijk niet echt past bij de sfeer die ik m'n cottage wil geven. In plaats daarvan minder kasten en iets meer ruimte zodat er een klein keukeneiland en een achterdeur in de ruimte past.
Opnieuw een plattegrond gemaakt (de vierde en hopelijk laatste versie ^^);


Generally, I want to make the kitchen a bit lighter than the living room. With the ceiling beams stained in a lighter colour. A paneling of light wooden slats up to a height of one meter. A stone tiled floor in gray tones and white plastered walls and ceiling.
I made a mood board for myself with the images below from the internet.

In grote lijnen wil ik de keuken een wat lichter maken dan de woonkamer. Met de balken aan het plafond in een lichtere kleur gebeitst. Een lambrisering van licht houten latten tot een hoogte van 1 meter. Een stenen tegelvloer in grijze tinten en wit gestucte muren en plafond.
Ik heb voor mezelf een moodboard gemaakt met de onderstaande plaatjes van het internet.

Tiles behind the stove, maybe the
edge decorated with a strip of lace.

Maybe a pan rack above the sink unit.

A kitchen island/cart...

... with a rustic hanging pan rack above.

Those lamps, and this kind of stone floor tiles,
though in a lighter - more grey - colour.

There will also be a small table for two to three people, maybe a round one depending on how it turns out. And a third chair, which will have a wicker seat.
Finally I tried to draw a part of the kitchen, just for fun :')

Verder komt er nog een kleine tafel voor 2 a 3 personen, misschien een ronde afhankelijk hoe het uitpakt. En nog een derde stoel, die een rieten zitting krijgt.
Ten slotte heb ik voor de lol ook nog geprobeerd een deel van de keuken te tekenen :')

While I was drawing, I suddenly realized that I had never shared a photo of the AGA I made early this year, so here it is. Created using a tutorial from a book by Julie Warren.

Terwijl ik aan het tekenen was, realiseerde ik me opeens dat ik de foto van de AGA die ik begin dit jaar maakte, nooit gedeeld had, dus bij deze nog. Gemaakt met behulp van een tutorial uit een boek van Julie Warren.


So for now I can go ahead in the winter months. Hopefully I'll have the kitchen finished in the spring :)
I hope you enjoyed seeing my plans.
Thanks for the visit and have a creative autumn 💜

Voorlopig kan ik dus de wintermaanden vooruit. Hopelijk heb ik de keuken dn in het voorjaar af :')
Hopelijk vonden jullie het leuk om mijn plannen in te zien.
Bedankt voor het bezoekje en een creatieve herfst gewenst 💜


Wednesday, June 23, 2021

Sansevieria's and Bay leaf plants from diy-kits

I've made Sanseviera plants this weekend.
These were made with one of the diy-kits from De Hobbyshop I bought through OMINIS.

OMINIS is an international 'shopping centre' on the Internet. Born from the idea to create a kind of trade fair online in order to bring the participants and visitors together because the pandemic that started in March 2020 made organizing fairs impossible.
It's a shopping center with only shops selling handmade or handcrafted dollhouses and miniatures and shops with supplies for the dollhouse and miniatures hobby.


I also made a bay leaf plant, which was much more work ;)


I planted it in one of the pots I've made recently which meant I only used 3 out of 5 stems. I want to put the other 2 in a planter with other herbs.


I liked doing those kits, though I'll try to add a bit more detail and shading on the leaves next time :)

Sunday, October 11, 2020

Crafting together - September (birthday swap and Santa)

I keep lagging behind in writing these updates, so I'll keep this short and simple ;)
In September it was Jolinda's turn to get birthday swaps. I knew she had been working on a cheese farm so I made her a cheese grater and some blocks of cheese :)


I also made this kind of ancient Greek/Roman flower pot, hoping it would fit in her Greek project or in either one of her houses :) It was fun to do and I was really happy with the result. Liked making the Caledium plant as well.


And here are all Jolinda's presents. A Christmas tree and some wrapped presents from Connie, and Monique made a  plant and flower pot as well and a pretty storage box.


Links to the tutorials I used:

The previous crafting afternoon we'd talked about doing a little project together. Last year we did an autum scene, so we were thinking about something for Christmas this time.
Monique suggested we could dress up a Santa. We all liked that idea and Monique offered to make the dolls.

Meanwhile Jolinda looked through her stack of dolls house magazines and found patterns for six different Santa's. You can also find them online.


Jolinda had done the first one (in white) in the past and chose the Scottisch this time. Monique went for the Russian version and Connie chose the classic one (second one in the top row).
I decided to go for this nice seated Santa (DHN annual number 62 from 2010);


So, Monique had made the dolls. The hands and boots not yet glued, which is a good thing since my Santa has stockinged feet ;) 
Other than clothes he'll need some padding, a face paint, and a wig. (I've only given his face a thin layer of Gesso so far).


The four of us had an enjoyable afternoon working on our Santa's. I started on the ... uh, well 'onesie', I guess? Can't find a (good) translation for 'hansop' ^^


Unfortunately the pattern didn't match my Santa's size so I've been making new patterns these last couple of weeks. 
I'll show you after our next crafting afternoon though :)


Sunday, August 23, 2020

Crafting together - June & July

In June Jolinda, Monique and I finally met again, for the first time since the Corona crisis started.
It was a bit weird, but we kept the 1,5 mt distance rule as much as possible, and it was great seeing each other again.

Monique has been into something new; paint pouring. She's done some 1:1 paintings, vases and lampshades. And was willing to learn us to make a 1:12 painting using that technique.
I choose some blue and orange colours, hoping it would make a match with the colours for the cottage bedroom.


I like how mine turned out :)

Monique made two different sizes.

Jolinda kept it neutral with black, white and gold.

When the painting were finished we still had time for something else. Jolinda had brought 3 kits for cold porcelain plants. It was the first time I worked with cold porcelain and I struggled quiet a bit :')
By the time Jolinda and Monique left I still hadn't managed to make a succulent. So I decided to use the clay clutter with Fimo clay instead and ended with some semi decent succulents :)


The DHN magazine that month showed some of the workshop that were made during the summer.
I was proud to see two of mine in it ;)


The next time we met, I wasn't nearly as productive for some reason. I added (very few) leaves to the olive tree (for the Italian project) and painted the side table I made years ago, and always ended up in pictures ^^ Maybe I'll put it in the cottage bathroom, maybe not, so for now it's just a little scene with other purple and lila things.


Tuesday, March 20, 2018

Crafting together - March

Last week we had our monthly miniature club again. I thought I should call it a (little) club from now on, because we welcomed a new and enthusiastic participant, Monique ;)
Because she has small children, we'd moved the meeting to her place, so there was a lot of talking, getting to know each other and looking at her miniatures and dolls house beside crafting of course.
After working with Fimo for the last few times, we'd decided to continue with our roombox/garden project and to work on a climbing plant, so Monique could join in.
Jolinda and Monique choose to make an ivy, while Wil and I wanted to do a clematis.
We all started by painting thin shoebox paper and once both sides were done and dry, we each choose a paper punch to work with. In between Jolinda and Monique started with covering wire with paper for the branches, while Wil and I wanted to use the dried strawberry roots I still had.
It was a very enjoyable afternoon and before we left we already picked a new date for April!


I figured I'd need so much more though, so I painted more paper the next day.


So then I spent hours paper punching leaves and flowers :') 


Before I could start with the branches and twigs I made a trellis from Balsa wood. Just a simple design I remembered from my parental house, because that seem to fit in this small box.


I painted a planter made from bamboo lilac to match the colour of the clematis, and then started with the flagstones. I've wanted to try making these for some time, and this seemed like the right scene to have some :) I used a tutorial from Once Upon a Doll Collection as a guidance to start.


Tearing cardboard egg cartons in different colours of gray and brown into random stone shaped pieces, getting the shapes to fit together took more time than I anticipated :)


Then I dry brushed the stones with different colors of white, brown, gray and black. Not a technique I'm very comfortable with so far, but I really like how I managed here ^^ Especially after I added some green with yellow flock between some stones.


After taking this last photo I've also added some matt varnish (very carefully because of the flock).
So now I've no more excuses left to not start shaping the clematis leaves and flowers :)


Saturday, June 10, 2017

Plants, pots and hangers, oh my ;)


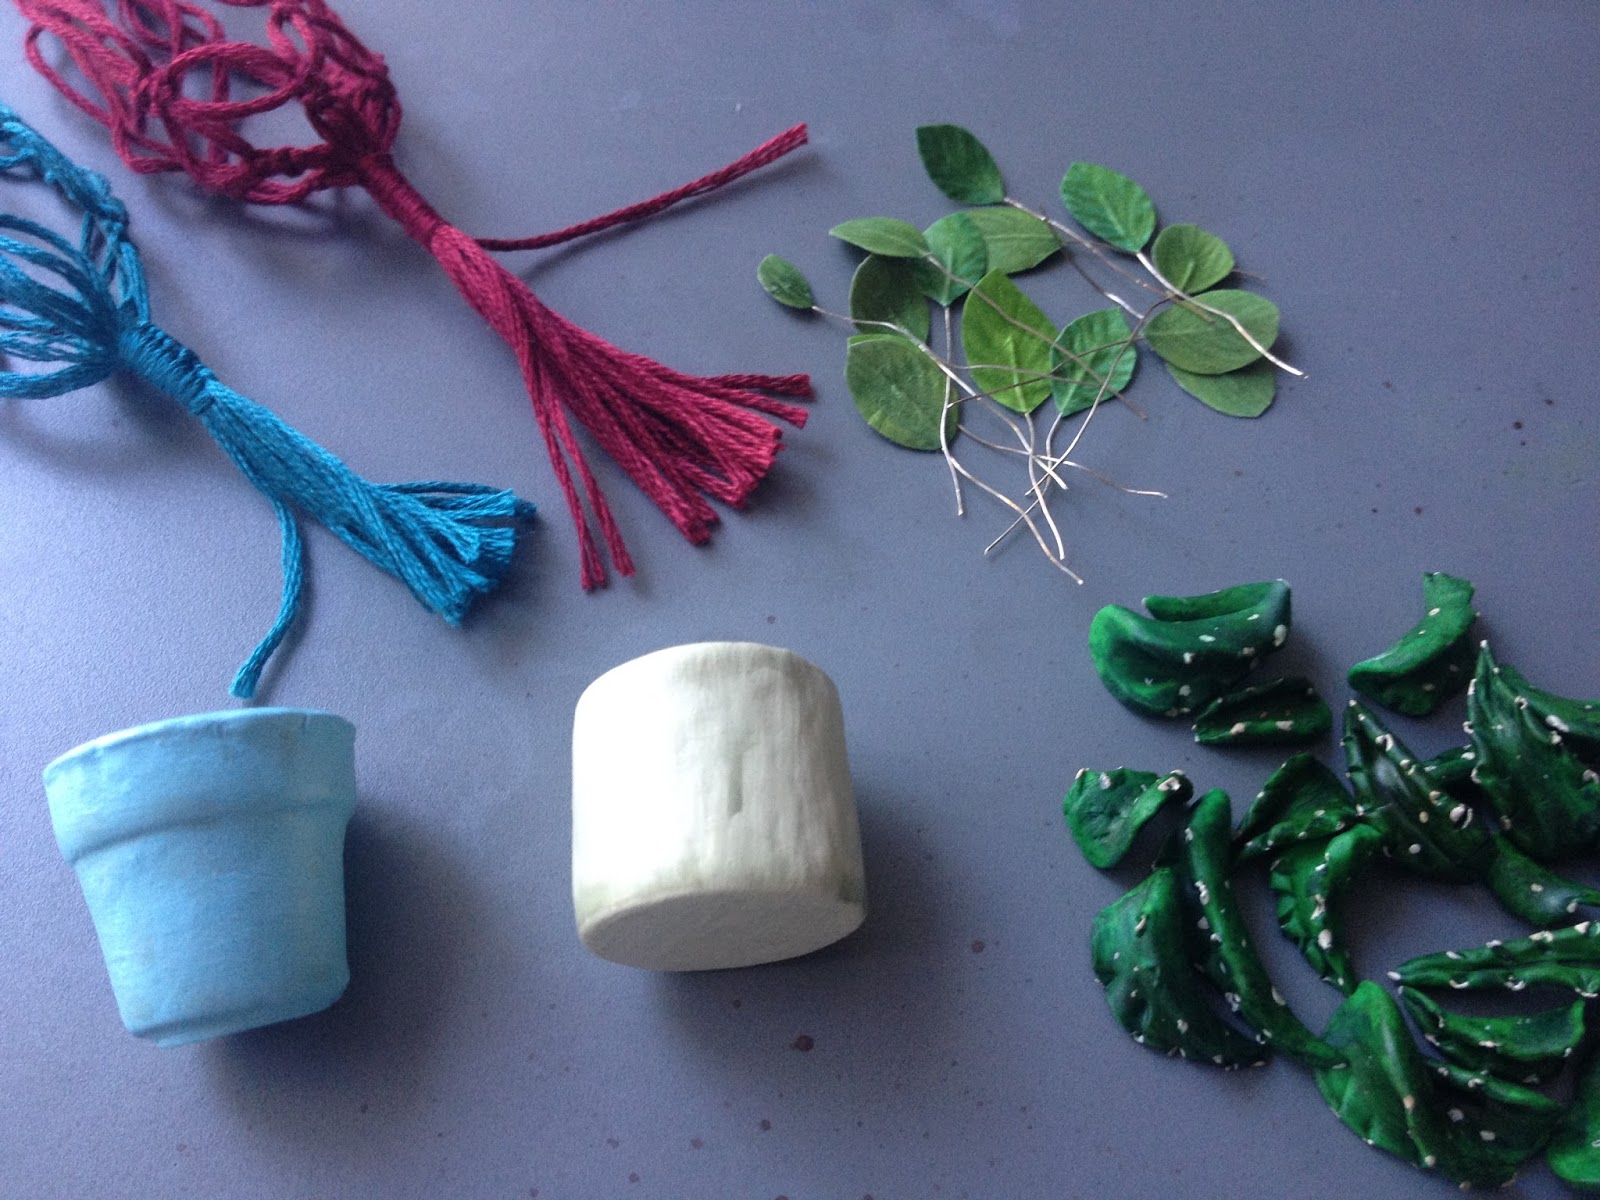
I've made two new macramé plant hangers the previous days, and I decided to make matching flower pots ánd fill those with plants.
Making plants or flowers isn't something I've done a lot. To be honest, it's something I like to do once in a while, but not more then one at a time. So, there probably won't ever be a flower shop in my future ;)

Anyway, let me show you the new plant hangers first. I just choose some nice colour from my box with embroidery threads first and made something up as I went ;)


I'd bought some flower pots at 't Tafereeltje, back in April, so I painted two of them with acrylic paint. Since I didn't take a separate photo from the flower pots, you can already see the leaves I made next :)


First I made an Aloe Vera (a succulent). It's based on this tutorial, but I used green Fimo.


I painted them after baking (left) and them I made them a bit darker with distress ink (left).


I chose the turquoise pot and hanger for the Aloe Vera and like how that combination looks. My Fimo plant making skills could use some improvement though (a)


For the other plant I'd found free printable leaves on line, from Nalladris. I used two for each leave, glueing them together with 2 cm of very thin wire between the paper. 
To shape them I used the same double-ended ball styluses you use for polymer clay. And I finished with a coat of clear nail polish :)


So, the result is two new listings for my Etsy shop, and two plants in pots for the cottage (or props in future photo's ^^).