Friday, May 15, 2020

A rocking Hippogriff


Since I'd made the book ends I've started other tutorials but got a bit sidestracked due to a infected tooth nerve.
And instead of finishing them I got inspired by another one of the daily tutorials from DHN on FB on Monday:')
The tutorial was for a rocking elephant (instead of a rocking horse) and it got me thinking about a Harry Potter version. Fantastic beasts were an obvious choice and the first one that came to mind was a Hippogriff.


So I started looking for images, cut and paste the different bodyparts in Paint like a jigsaw puzzle, adapting them, added bits and pieces of my own and resized it to fit the markings on the original pattern. Not easy but definitely fun and challenging :)
When given a HP twist, those daily workshops really take multiple days to make, but then, I would never make a rocking elephant lol


When the drawing finally was exactly the right size and to my liking, I coloured it with acrylic paint.


I scanned the painted version, copied one in Paint for the other side, printed it on linnen paper, cut them and painted the cutting edges black.
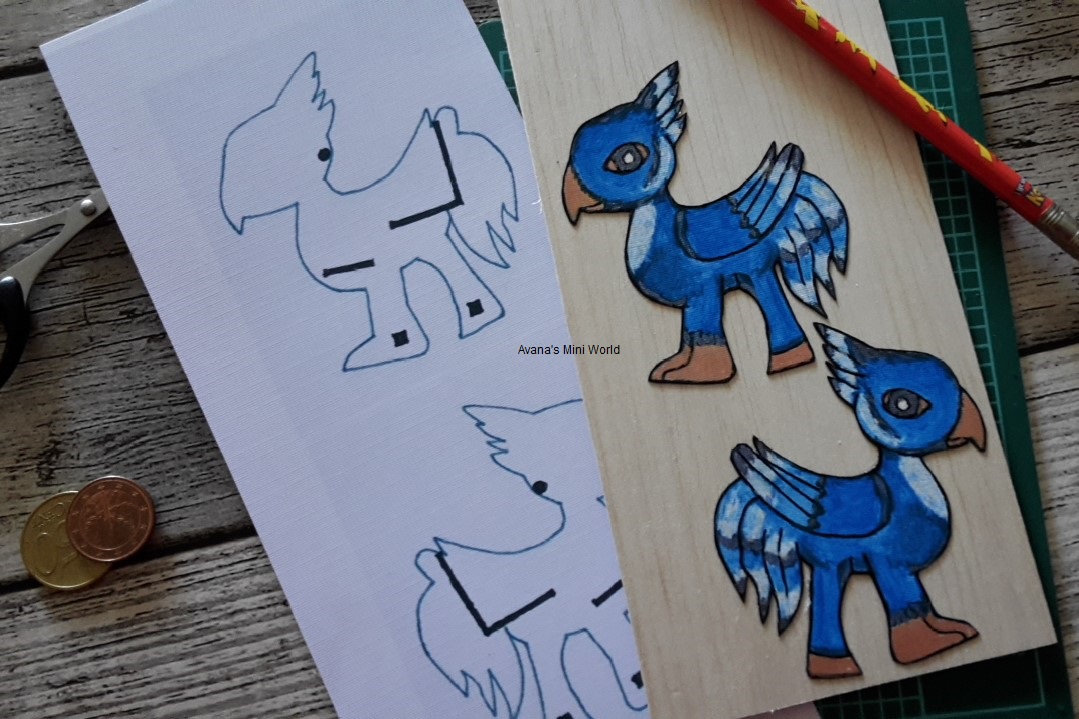

I added some shiny touches with metalic acryl paint and glued them on Balsa.


After that I cut the two hippogriffs out of the wood, which was obviously a very precise job. Though sanding the edges was even harder; I was so worried the Balsa would split or just crumble. I got the markings on the backs by cutting them out of the paper Hippogriff :)


I painting the back of the Hippogriffs twice.


And finally started building the rocking hippogriff :)


Painted the seat and other parts ...


... before I glued the second Hippogriff in place :)


Time to make the rockers. I made these from cardboard (two layers) because I didn't think I could cut a sturdy pair from Balsa ;)
After a layer of Gesso, I painted them with black acrylic and glued them - not under but - at the back of the feet. Accidentally fitting just against the support beams between the feet.


With two coats of varnish it's finished! And I love it <3
Don't know where I'll place it, but that doesn't matter for a change ^^


Sunday, April 5, 2020

Bookends for a little Quidditch fan

Working on the cottage involves a level of decision-making I'm not up to atm during these difficult times.
Fortunately Dolls House Nederland is reposting old tutorials from their magazine on Facebook. One of them caught my eye and inspired me to make this cute bookends pair.  :)

Ten year old Quidditch fan Penny will love these
bookends decorated with Golden Snitches
on a bookshelf above her bed.

I made the Snitches from Fimo polymer clay and beads.

Painted the bookends and the
Snitches twice gave it a finish with
gloss paint. I used metallic gold
acryl paint for the wings.

Perfect fit for the room, right? ;)


Sunday, March 29, 2020

Finished the Queen Anne wing chair for the living room

I hope you are doing well and stay safe in these dificult times 💜

Though I haven't been able to many miniatures, I've finally finished the Queen Anne style upholstered wingback chair for the living room.


I'd showed you some w.i.p. photo's before, from what I had done in November;


Eventhough I didn't have a kit, the
 photo instructions from 1inchminisfromkris 
were very helpful! You really should visit her
blog if you've never done before :)

Working on the front arm covers.

First time I made piping instead of
using cord. So much easier than I
thought it'd be, and I love the result!

I've made a depression in the cushion
to give it a 'sat in' look.

I've cut 3 mm of the legs I'd bought
before they were oak stained.

Credits:
Flowers by Kim Donovan
Knitted rug by Nine Vogel

~O~

Take care of yourself!
Stay home
Stay safe
Safe lifes

💜

Tuesday, March 17, 2020

A dolls' house for Penny

In the previous blog I promised to show you an update on the bedroom next, but I just finished a little something today that I want to show you first.

It was actually meant for the bedroom but it turned out a bit bigger than I thought it would for an 1:144 scale miniature.

Yes, that's right, 1:144 scale! A dolls' house for a dolls' house ;) I've always wanted to make one, just for the challenge, and because it would be great for the little girl living in the cottage. I just forgot she needs to share the only bedroom with her mum, so there might not be enough room with two beds and the other furniture (a)

There are a lot of amazing tutorials on Youtube for 1:144 scale dolls' houses. The one I followed is this one from The Square to Spare, so I'll just show you some of the (many :P) photo's I took.

Instead of popsicle sticks and coffee stirrers I used
Balsa wood.

And I cut out all the windows and
doors before I glued the walls together.

Once I'd finished the porch, the railings
  and the dormer I let Penny have a look.
She was very pleased ;) 

After I'd painted the front and interior with white
acrylic paint I made the clapboard sinding.

The floor were painted as well, with a
watered down brown acrylic.

I was so happily working on all the little details that I totally forgot to take photo's untill it was done :')

I've chosen a vanilla yellow colour.

Penny is admiring her dolls' house.

It's certainly bigger than I expected
from a 1:144 scale house :')


The teddybear was made by Monique, and the Weasley-
style rug was made for a swap by Nine.

Sunday, March 15, 2020

Cottage living room update

I knew I was behind with things but I hadn't realized how much :')
Apperently I'd started writing an update on the cottage in January but never finished that.
So without further ado, this is the progress on the cottage living room from January, mainly pictures ^^

I'd started making a comfy wing back chair back in December before we started working on Christmas miniatures. Once of these days I'll finish it (a)


I made new curtains because the first set I made was 1 cm too short.


I've put the glass stained deer from 'Glaskunst in Miniaturen' and the cute snapdragon Kim (Bibbidi Bobbidi Boo) made me, on display. Doesn't it look cosy? :)


The rod of the wall hanger Jolinda had made me, was made a bit darker to match the living room.


I made a bellows with this tutorial, using cartboard, thin leather and a metal bit I cut from jewelry.


I used the veneer slats from Bibian Angelique Miltkau for skirting boards.


I still had planned to do more furniture for the living room, but I had started to wonder if it wouldn't be too crammeded with more cabinets, a desk and chairs. So I decorated the room with the things I already had and quite liked it already :)


So, I've decided to keep it this way and only add the little decorative and personal items later on. I really like how it has turned out so far! Even though it's not as Weasley boho chic as I imagined at the start. But then, Bianca isn't Molly Weasley, is she? ;)


Next, an update on the bedroom, which I've started working on in February (a)

Friday, January 31, 2020

Crafting together (January)


For the first crafting afternoon this year I was all set for working with Fimo. I'd even bought five new colours ^^
So while Jolinda was working hard on the stairs for her Greek scene and Monique was making a lot of different miniatures from Fimo, I tried my hand at making a polymer clay cane. I'll just show you some (bad ^^) photo's this time.

A polymer clay cane is a log of polymer clay that’s made with a design that runs the entire length of the log. Slices from the cane will reveal a design and all slices from the cane will have identical designs. A polymer clay cane can be reduced by squeezing and compressing. This makes the diameter of the log smaller and the design smaller. Source and more information: here 
 
I used this book by the talented Angie Scarr.


The most challenging part for me was
to cut them into very tiny slices.


I was amazed that I managed to make
one cane and even a cabbage while
the ladies were here; never been so
productive before lol


And I even made some cauliflowers later that afternoon.


I did have fun making them and I'll certainly want to do more
fruit or vegetables from the book ^^ There is definitely
room for improvement, but I think it's not too bad for a first try ^^
They might end up in the Italian project :)