Tuesday, January 31, 2017

Samen knutselen / Crafting together - Januari


Gisteren kwamen Jolinda, Wil en ik voor het eerst in het nieuwe jaar weer samen om gezellig te knutselen. We hadden besloten om verder te gaan met het tuinproject, waarvoor we vorig jaar al dit plantenbakje, dit vogelhuisje, dit tulpenbakje, en deze tuinbank hadden gemaakt.
We willen daar ieder een leuk kijkkastje van maken, met zicht op een buitenmuur met bijvoorbeeld een raam en/of deur.
Volgende keer gaan we beginnen met het aankleden van het kastje, maar gisteren zijn we aan de slag gegaan met het maken van een straatbezem met behulp van de uitleg uit Poppenhuizen & Miniaturen nr. 147.

Toch wel best een nieuwe uitdaging waarvoor we moesten zagen, boren en frezen. Angst voor apparaten moest (vooral door mij) overwonnen worden en we leerden hoe we moesten werken met een houtfrees.
Best lastig in miniatuur maat, maar het lukte ons ;)


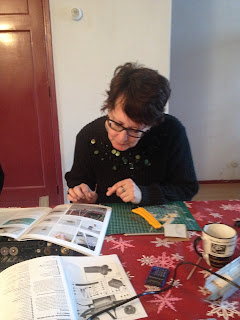
Wil geconcentreerd aan het frezen.

Jolinda kijkt wat de volgende stap is.

En Spuit elf begon net met frezen (a)

Omdat er weinig tijd overbleef om te beitsen, en het droog te vervoeren, besloten we dat ieder zelf te doen. Ik heb het 's avonds nog gedaan, zodat het vanmorgen al droog was.


Na het beitsen moest alleen de borstel er nog in gelijmd.  Die bleek ik echter te dun gemaakt te hebben, dus staat er inmiddels een nieuwe kwast in lijm :')

Sunday, January 29, 2017

That '70s style

While I was waiting to get my courage together (#jigsawfear), I researched that Weasley's boho chic style I talked about. I gathered lots of pictures and made a new Pinterest board called Boho chic inspiration and one for for wonderful Colour combinations :)
I discovered that I seem to like turquoise combinations a lot. And so I picked these colours for the Hogsmeade house living room, probably with some others as well, maybe ochre.


Something else I noticed; the boho chic style shows a lot of plant hangers, cushions, rugs. That's something I can do while building the house, because I like to alternate that with some smaller, easier crafts ;)
When I saw the pictures of plant hangers I remembered how I loved doing macramé when I was a teenager.


Macramé comes from a 13th-century Arabic weavers’ word migramah meaning “fringe”. This refers to the decorative fringes on camels and horses which help, amongst other things, to keep the flies off the animal in the hot desert regions of northern Africa.

Macramé regained popularity during the 1970s as a means to make wall hangings, articles of clothing, bedspreads, small jean shorts, tablecloths, draperies, plant hangers and other furnishings. By the early 1980s macramé had again begun to fall out of fashion as a decoration trend.
Source

Well, you can guess what happened next, can you? ;) Within a day I'd brushed up my knowledge on knots, and remembered that there was a tutorial in one of the latest isssues of the P&M magazine (no. 143).
I choose two colours of embroidering thread; DMC 828 (the light blue) and 321 (the red one). The treads were not as thin as they're suppossed to be so that's propably why they were too short and I ended up with some unintentionally knots (a) I also skipped some knots when I figured out the hanger would become too large.


I wanted a more colourful flower pot than the one in the photo above, so I painted that one red, and then made a few more from Fimo.


Maybe next time I'll paint the beads as well, but I like how this first one looks xD


And yes, I said 'the first one' because I almost immediately started the next one ;)


I really enjoy doing macramé (again) and find it a relaxing pastime, so I predict you'll be seeing a lot more macramé crafts in the near future.

Thursday, January 26, 2017

Building stairs

Before I could start building to house, I wanted to know how high the stairs where going to be. So last weekend I spent hours looking for stair measurements, found lots of tutorials as well and ended up making one :)
Most helpful was this one I found on a French blog, Les Mains Calmes, even though I don't speak more than a couple of words in French ^^


 I used 3 mm Balsa wood for the sides and treads, and 2 mm for the risers.


I managed better than I anticipated, and I felt a little bit proud for trying, because I thought I'd had to buy it . First I glued half of the risers in place. Once I'd figured out how deep and wide etc it should be, it wasn't that hard.
By the end of the day, I glued all the risers and half of the treads.


The next day I did the treads and sanded everything. For the photo it's in Draco's unfinished room(box) agains the right wall, but it will be placed in the entrance hall of the Hogsmeade house against the left wall.
Later I plan to make a handrail and bannisters on the right side to prevent Penny from falling down the stairs ^^ I'm fearless now ghe ghe


Wednesday, January 25, 2017

A new project

Though the quill shop isn't totally finished, and Draco Malfoy still needs a room for his fourposter bed, I've been thinking about a new project for a while now :)
I've been changing my mind back and forth between different idea's but couldn't decide. I wanted to do something bigger than a roombox, but smaller than a dolls house. I wanted to do something Harry Potter related, but couldn't think of the right project, and also I wanted to try some of Julie Warren's tips about decorating a dolls house.

So ... I combined all those things and this is what I'm going to do;
I'll build (yeah, right, build x'D) a little cottage for a new Hogwarts teacher who rented a little house in Hogsmeade with her ten year old daughter, Penny, for the summer after Voldemort was defeated.
Her name is Bianca Versteeg and she's a character from my Dutch Harry Potter fanfiction 'Wentelende Wereld' (Turning World) and she's a forty year old witch with lots of secrets, who has been hiding from the Wizarding World for the last eleven years.


Once I figured out what I wanted, I could start making plans. The idea of building and decorating  a house still  sounds a bit scary if I think about it for too long, but that's where Julie Warren's tips might be very helpful. Probably even lifesaving ;)
She shares lots of great tutorials about making furniture on her Facebook page, but what convinced me that I'd be able to do it, was the way she showed how to decorate a room.

Photo from Julie Warren's Grosvenor house

So, based on that I made a plan last week. Living room and kitchen on the ground floor and a bedroom with two single beds and a bathroom upstairs. The way I described it in my story, so have to stick with that.


Hogsmeade was designed with very tall narrow chimneys just like a lot of villages in Scotland village. So for the outside I want the look of a Scottish cottage. 
Friend and fellow miniaturist Kim thought the Hogsmeade houses were based on the granite stone buildings that are very typical of Scottish houses. This one reminded her of the top two floors of the Grosvenor house;
 
 
I talked with my dad about my plan drawings, since he's a really handy guy and I wanted to go over the wood meassurements I need. Because that's a big step, right? :)
He give me some advice and made some suggestions. Next day I went to a DIY-store and bought wood.
I got 2 sheets of 4 mm Poplar plywood, 122 x 61 cm and they did saw the two floors for my house at the store, so that's something I don't have to do at least ;) 
Because I'm anxious for when I'll have to use my Jigsaw for the first time!

I also ordered Julie 's book, Step by Step Dolls' House Furniture Projects in 1/12th Scale, and that arrived today. So exited XD


For the home decorating I want it to have the kind of feeling of:

Weasley's boho chic Burrow

With a gaggle of seven hot-tempered red-heads to look after, Molly Weasley hasn't got the time for formality. That's why the eclectic boho chic look works so well for eccentric family.
Comfort and function are absolutely essential when selecting pieces to capture this look, but so is uniqueness. Forgo the cookie-cutter options you'll find in furniture chains and scour flea markets instead for one-of-a-kind pieces. Look beyond the current appearance of each item to find tables and sofas with a bare-bones design you like, since you can always paint or reupholster. Select a palette populated with jewel-tone reds, blues and purples, and incorporate plenty of patterns for a rich, gypsy look. This look demands diversity in design styles, so forget finding matching sets or patterns and instead pick pieces that complement one another.
While the number of people packed into the Burrow necessitated a plethora of stuff, clutter will quickly kill this look. Avoid styling like a pack rat and remember this simple design law: Less is more. Arrange accessories in groups of three to create a magical balance and banish all unnecessary bric-a-brac.


Wednesday, January 11, 2017

Thea's Adventskalender - deel 8 en andere kerstknutsels.

Een beetje later dan gepland door omstandigheden, maar nu wordt het toch de hoogste tijd om alle kerstgerelateerde dingen achter me te laten ;)

Om te beginnen had ik nog beloofd het eindresultaat van Thea's Adventskalender te laten zien. Op het flesje met de twee glazen na (dag 11) heb ik dit jaar alle workshopjes gedaan. Ik weet niet of dat komt omdat ik nu meer gevorderd ben (a), er veel meer materialen in huis zijn of omdat de workshopjes toevallig wat eenvoudiger zijn. Ik vond het weer erg leuk om mee te doen, ook al viel ik niet in de prijzen ;)
Het was ook leuk om de andere inzendingen te zien. Het is dan ook zeker de moeite om even een kijkje te nemen op Thea's Miniatuurwereld!
Hier is in ieder geval mijn inzending;


Ik had hier al uitgebreid de poef beschreven die ik gemaakt had in plaats van het gematte krukje. Dat krukje vond ik echter wel leuk en het matten leek me een uitdaging, dus heb ik dat vorige week alsnog gemaakt :)
Het krukje zelf heb ik gemaakt van Balsa omdat ik geen harder hout had van 4 mm,, maar erg handig werkte dat niet. Vooral niet tijdens het matten :') Plus het is een beetje scheef geworden (a)


Behalve met de Adventskalender, was ik ook begonnen met een kerstkraampje. Na het maken van het kraampje zelf, ging mijn tijd echter vooral in de Adventskalender zitten, dus heb ik het, met voornamelijk spulletjes van vorig jaar, een beetje aangekleed voor tijdens de feestdagen. Eind van het jaar weer verder :)


De kerstelf staat hierboven een beetje verdekt opgesteld. Dat komt omdat hij nog niet volledig was aangekleed :P Ik had de mantel van een goedkoop, plastic kerstmannetje van de Action gepeuterd en mouwen etc ingekort en aangepast. De muts is van vilt en kostte een aantal pogingen voor ik een model had waar ik tevreden over was. Beide kledingstukken moeten nog afgewerkt worden en natuurlijk heeft hij en maillot en schoenen nodig. Ook iets om later dit jaar mee verder te gaan.


Tussendoor nog een paar kerstkransen van stof gemaakt. Erg leuk om te doen, dus die zijn vast in december te koop in het kerstkraampje ;)


Wat ik erg leuk vond, is dat ik de afgelopen weken tot twee keer toe een miniatuurverrassing door de postbode gebracht werd!
Eerst dit leuke cadeautje van Artofmini. Dat komt volgend jaar zeker opgepimpt in het kerstkraampje.


En tenslotte een bedankje van Thea voor de deelname aan de Adventskalender; een pakketje om een houten etalère te maken zoals deze hieronder van Thea zelf.


Foto van Minidoor.

En nu is het hoog tijd om ook de laatste kerstspullen op te ruimen en lekker te gaan nadenken over nieuwe projecten ;)


Thursday, January 5, 2017

Thea's Adventskalender - deel 7


Tenslotte zijn hier de laatste twee workshopjes die ik nog niet had laten zien. Morgen het eindresultaat! :)

Last but not least I want to show you the last two workshops I did. Tomorrow the finished result! :)


Dag 22:  het mandje met open haardhout.

Day 22: the basket with firewood.


Dag 17: een houten kerstboompje. Hiervoor heb ik voor het eerst m'n nieuwe miniboormachine gebruikt ;)

Day 17: a little wooden tree. I used my new mini-drill for the first time to make this one ;)


Thea's Adventskalender - deel 5

We zitten inmiddels in 2017 en natuurlijk wens ik jullie allemaal veel goeds toe, en vooral veel creativiteit :)
Het is hoog tijd om het Adventsproject af te ronden; morgen is het namelijk de laatste dag om een foto in te zenden voor de prijsuitreiking.
In deel 1 had ik destijds de onbewerkte deur, het bureaublad en de (boeken)plank laten zien. Voor ik het geheel in het tafereeltje toon, gun ik jullie alvast een blik op deze onderdelen nu ze geverfd en in elkaar gezet zijn.

It's already 2017 and of course I wish you all the best for the year to come, and especially lots of creativity :)
It's about time to finish the Advent project; tomorrow will be the last day to send a photo for the challenge.
Awhile ago, in part 1, I showed you the bare wooden door, desktop and (book) shelf. Before I show you the whole picture, here's a sneak peek  of how the different parts look like now that they are painted and put together.


Ik heb gekozen om alles wit te schilderen omdat ik dat het mooiste vond bij de overwegend rode en groene kleuren die ik wilde gebruiken bij de andere workshopjes. De onderkant van het bureaublad heb ik iets anders gemaakt, zodat de poten dichter bij elkaar staan.

I've choosen a white paint for everything because  that seemed like the best background colour for the red en green colours I wanted to use for the ander workshops. I made some changes to the desktop, so now the legs are closer together than originally was meant to be.


Hier kun je zien hoe verschillende werkjes erbij passen. Behalve de dingen die ik al eerder heb laten zien, ook een vaasje met twee kerstrozen, een variant op het vaasje met drie bloemen voor dag 9 ;)

A picture of how the different items look against the white door. Most of them I've already showed before, except for the vase with two poinsettia's. Which is an alternative to the vase with three flowers from day 9 ;)

Thea's Adventskalender - deel 6

Voor dag 12 kregen we een workshopje voor een houten krukje dat we dan de volgende dag konden 'matten'. Ik vond het erg leuk en ik wil het sowieso eens proberen te maken, maar voor m'n kersttafereeltje vond ik het minder geschikt (a)
Dus ben ik op zoek gegaan naar een alternatief dat achteraf gezien nog veel bewerkelijker was :)
Ik ben met vier verschillende kerststofjes aan de slag gegaan om een poef te maken. Enerzijds ben ik wel trots dat het me überhaupt gelukt is, maar ik stoor me ook aan een paar dingen dus ik ben inmiddels al aan een verbeterde versie bezig ;)

Day 12 was a workshop for a wooden stool. The next day we were supposed to weave the seat. I liked the idea and I definately want to try it someday but I didn't think it would fit in my Christmas scene (a)
So I went looking for an alternative which turned out to be even more laborious than the wooden stool with woven seat :)
I used four different fabrics to try and make a pouffe. Although I think it might also look like a birthday cake I'm kind of proud I managed to figure it out all by myself. But being a perfectionist I'm already trying to make a better (looking) version ;) 


Ik denk dat de foto's wel voor zich spreken, maar mocht je vragen hebben, stuur me dan gerust een berichtje.

I think the photo's are self explanatory but if you have questions don't hesitate to ask me.

 
 First I made a paper model.

   
 Then I made one part with the fabric to test it.

When I finally figured out how to proceed, I made eight part which I then put together. That was the hardest part ;)