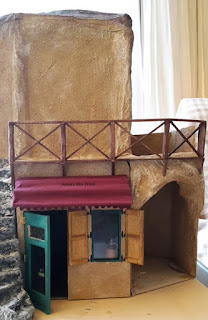
So, after deciding that had to change, I made a bigger and better base (plate) than the one I had.
I cut the corners on the back, following the mountain edge, and got a larger area for the bistro terrace, so I could plan where to put a tree. I used the cardboard tube as reference for the tree height.
I thought an olive tree would look great on that corner, so I searched for tutorals to get me starting (like I always do ^^).
Unfortunately I couldn't find any, only for trees in general. Or for olives :) The only YT tutorials I've found were in Spanish and were no help to me at all :')
Instead of searching a couple more days I decided to just start and make the trunk and larger branches and then see what kind of tree it would become :)
This turorial helped me with making the wire base: click
To get the right size I folded thin wire to a lenght of 30 cm, without cutting the ends (yet).
Because I ran out of the thinner wire, I used the green one for the roots, cutting pieces of 15 cm and folding them.
Then onto the fun part; figuring out how to shape all the branches and twigs :)
It took some time but I found it very relaxing, did it during a tv show ^^
After finishing the wire base, I switched to another helpful tutorial, which showed the technique of making bark: click
After I'd googled old olive trees I'd figured that tutorial would be great for a gnarly trunk, but in hindsight I probably shouldn't have used one of a Halloween tree for that (a)
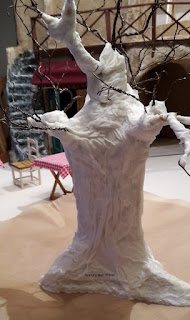
Here I've put some tinfoil round the trunk of the tree and covered it with masking tape.
Then I covered it with tissue paper soaked in water & glue. I hoped the tissue paper might still make it bark-like, but a bit more subtle than paper towels or news paper.
I covered all the wire that was twisted, but not the ends because I didn't want those twigs to become too thick. Instead I painted them with nail polish ;)
When all the wire was covered, either with tissue paper or nail polish I started with the first layer of black acrylic paint with water mixture, as shown in the tutorial.
It took multiple layers because everytime I thought I could go on to the next step/colour, I noticed some tiny white spots in the cracks of the trunk or on the branches. No matter how much I rotated the tree or turned it upside down :)
I forgot to take a photo from the black tree, since I couldn't wait to start with the next colours.
After two different brown layers it looked a bit rusty. Which made me think, it wouldn't need leaves, if it was a dead tree ghe ghe
But it might ruin people's appetite, sitting at the bistro table under that bare and dead looking tree. It could be dangerous; a dead branch might fall down!
So, no chance to avoid making thousands of leaves :')
For the layers of paint I used, from left to right;
1. burned umber, just painted the surfase, not into the cracks
2. burned sienna, only dry brushing over the tissue paper, but painting the nail polish
3. yellow ocre mixed with sap green, again only dry brushing over the tissue paper, but painting the nail polish
4. to high light I mixed off white chalk paint with a drop of gold acrylic and cottage green. I just used whatever I have lol
5. finally I added some green in that previous mixture, so hopefully it would look less spooky :')
Did you notice the real leaves under the tree?
They're from an olive tree! I'd forgotten there's one in my backyard :D
That would have made a great reference.
I'm thinking about making a new tree for this project and keep this bare and spooky tree for a Halloween scene, but I'm not sure :)
Anyway, here's the tree in front of the trattoria. With some props already in place :)
The cute little rabbits are made by my dear friend Kim, from BibbidiBobbidiBooCo.
They will find a nice place somewhere between the flowers on the mountain or at the bottom of the tree :)


